Last updated on
Explore diverse garage workbench ideas that can transform your space into an organized, efficient, and creative haven.
Transforming your garage into a functional workspace can be a game-changer. Whether you’re a DIY enthusiast or a professional craftsman, a well-organized garage workbench is a must-have. This article offers a myriad of garage workbench ideas to help you create a space that’s both practical and inspiring.
From space-saving solutions to workbenches with built-in storage, you’ll find a range of options to suit your specific needs. Read on to explore how you can maximize your garage’s potential and make your DIY projects more enjoyable and efficient.
Wall-mounted Folding Workbench
A wall-mounted folding workbench is an ergonomic, space-saving solution, particularly suitable for smaller garages or multi-functional spaces. When not in use, you can simply fold it up against the wall, recouping valuable floor real estate.
Some key features of this design include:
- Space Efficiency: It’s a smart way to utilize your wall space, maximizing the area’s utility and reducing clutter.
- Easy Access: It can be installed at a comfortable height for the user, ensuring easy access while working.
- Customization: You have the freedom to customize the size and material of the workbench to fit your specific needs and style.
To set up a functional wall-mounted folding workbench, consider the following steps:
- Select and cut your preferred workbench top material, like hardwood or plywood.
- Secure the foldable brackets to the wall studs, ensuring a sturdy hold.
- Attach the workbench top to the brackets, confirming a level surface.
Remember to plan for storage, perhaps utilizing the wall above the workbench for hanging tools or installing shelves. It’s also worth considering integrating some form of lighting above the workbench for better visibility during tasks.
Mobile Workbench With Wheels
Capitalizing on mobility, a workbench with wheels has multiple advantages for the garage space. Past the obvious benefit of easy relocation, such a design opens up your garage for other uses, making it a versatile workspace. The design combines practicality, convenience and better space management.
- Easy Relocation: This design allows the user to move the workbench to different areas in the garage according to the task at hand, or even outside if more space or ventilation is needed.
- Space-saving: Another feature is that it can be simply rolled out of the way when not in use. This way, the garage can be transformed back for storing vehicles or other items effortlessly.
- Versatility: With a mobile workbench, one spot isn’t tied down as the work area. It can be rolled closer to a power source, a natural light source, or out of the way when larger projects come in.
- Convenience: Tools and equipment can be kept on its surface or shelves while moving, saving the time and effort it would take to carry individual items one by one.
To implement this in your garage, you will need to ensure the chosen design fits your space and meets your specific needs. Some considerations are the wheel design, weight capacity, and the overall structure of the workbench. Locking wheels are highly recommended to secure the workbench in one place while working. All these factors will ensure optimal performance of the mobile workbench and accentuate convenience in your DIY projects.
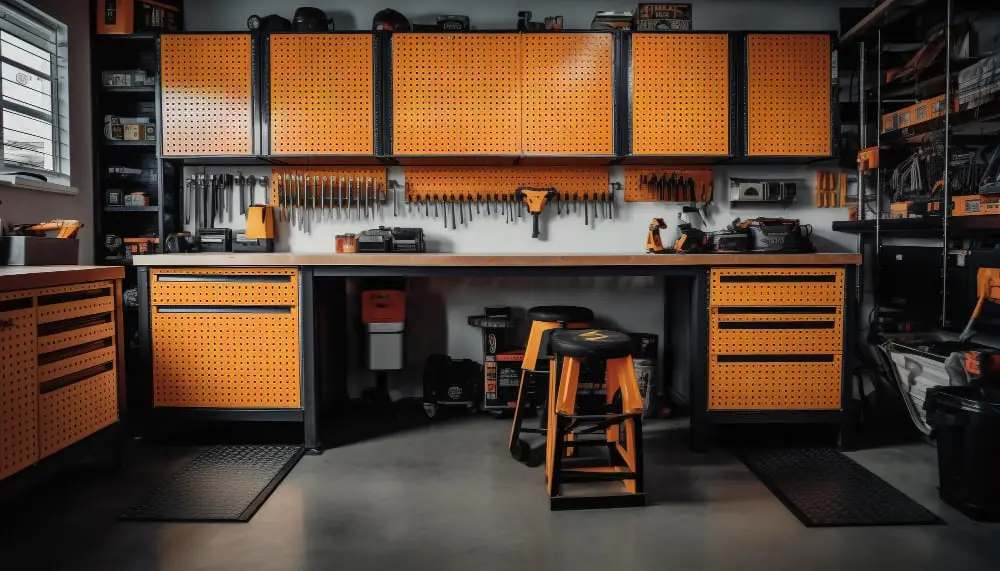
Workbench With Integrated Tool Storage

A workbench with integrated tool storage boasts numerous benefits. Firstly, this design is an organizational haven. It keeps tools at arm’s length, eliminating the need to scramble for a tool in the midst of a project.
The setup often involves drawers, shelves, and compartments. You can designate specific spots for different tools based on their size, usage, and frequency. This system drastically minimizes clutter, enhancing efficiency and safety as you work.
Furthermore, some styles have lockable storage spaces. This feature can safeguard pricy or sharp tools from theft or misuse, especially if children are present.
To create such a setup, start by identifying the tools you often use. This step will guide the layout and size of your compartments. Secondly, add labels to each division to make retrieval straightforward. Finally, routinely return tools to their designated spots to maintain order.
Embracing a workbench with integrated tool storage doesn’t only streamline your workflow but also extends the lifespan of your tools by offering a secure and proper storage solution.
Corner Workbench Design

Making optimal use of the garage space is critical, especially if the garage isn’t spacious. Enter corner workbench designs, a smart way to utilize an otherwise overlooked corner area of the garage. These workbenches can be custom-built to fit your garage dimensions and offer ample workspace for various DIY projects.
Multiple benefits come with a corner workbench design:
- Optimized use of space: Fitted into the corner, this design doesn’t obstruct the vehicle’s path and offers significant workspace.
- Enhanced storage: Oftentimes, a corner workbench can include cupboards or shelves under the table, providing extra storage for tools and materials.
- Greater surface area: The corner placement may afford a larger work surface compared to a standard linear bench.
Some tips to get started on your corner workbench include:
- Assess your space: Take accurate measurements of the corner area to ensure your workbench will fit.
- Design to suit your needs: Plan shelving or cabinet space based on the tools and materials you frequently use.
- Choose robust materials: Durability is key, opt for materials like solid wood or metal to ensure your workbench withstands heavy use.
- Safety First: Ensure the bench is adequately secured to avoid any accidents.
- Consider built-in lighting or power outlets: These enhancements can increase the usability of your corner workbench.
Remember that a corner workbench design’s success lies in its customization to meet your specific requirements and the available garage space. Be creative and practical in your design process.
Heavy-duty Wood Workbench

A heavy-duty wood workbench is an enduring choice, often favored for its strength and durability. This robust design, typically crafted from hardwood like oak or maple, lends itself perfectly to a variety of home tasks, from woodworking to metal works.
One key element of this workbench style is its sheer resilience. It’s designed to withstand heavy loads and rigorous use without succumbing to damage or wear.
Notably, its solid wood construction creates an ideal surface for DIY activities. The flat, stable, and often quite large top offers ample workspace, designed to manage high impact work like hammering or sawing with ease.
Surprisingly, a heavy-duty wood workbench can also add to your garage’s aesthetic appeal. The natural wood finish contributes a rustic charm, while the significant size communicates serious workmanship.
The ability to customize this type of workbench is another major advantage. You can add storage options like drawers, pegboards or lower shelves for tools and materials, reducing clutter and maximizing efficiency.
Lastly, it’s crucial to maintain this workbench to ensure longevity. Regular cleaning, occasional sanding, and timely varnishing can keep the bench in top condition for years, protecting your investment.
Remember: the weight of such a bench will require a solid floor setup. Always check the garage structure can handle the load before installation.
Compact and Portable Workbench
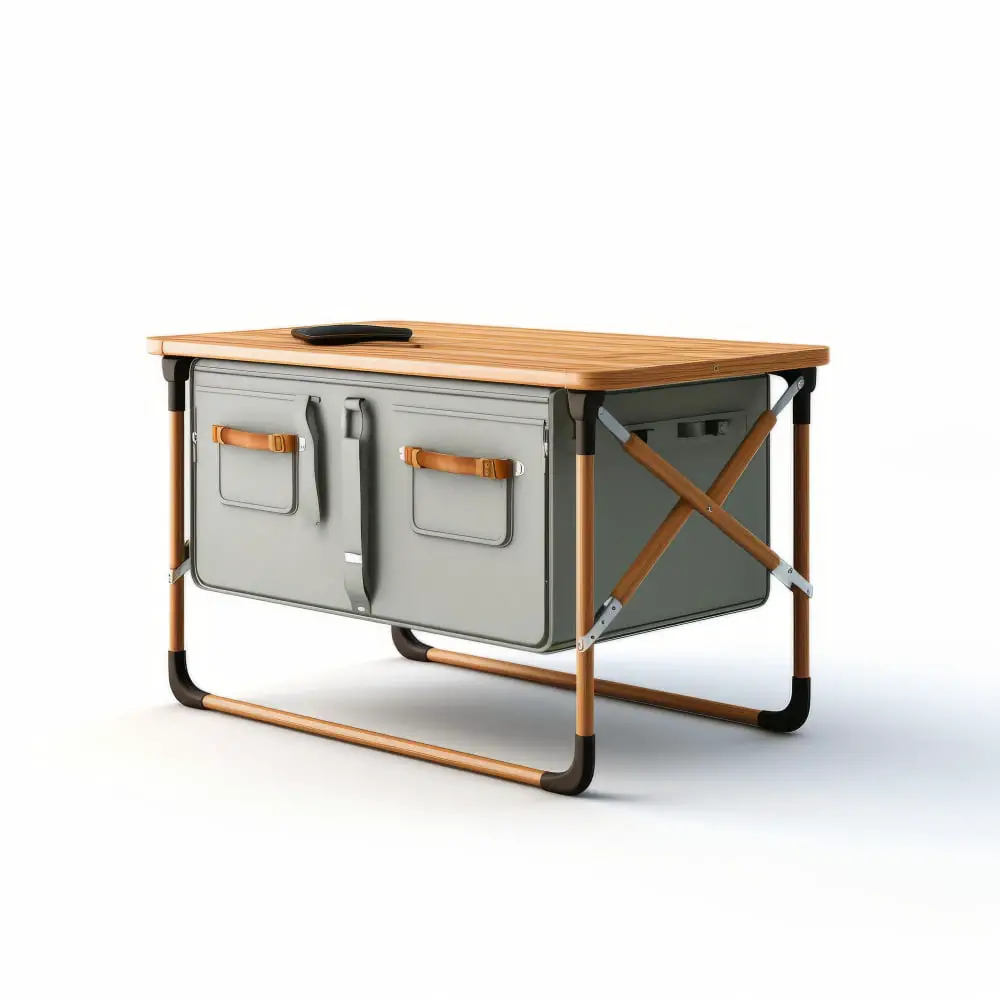
For those who often engage in works on different sites or have a limited workspace, a compact and portable workbench becomes an indispensable tool. These types of workbenches offer the perfect blend of size and mobility without compromising on the functionality.
- They are designed to be lightweight yet sturdy, allowing you to perform a range of tasks with ease.
- A typical feature of portable workbenches is a simple folding mechanism which facilitates quick set up and knockdown, thereby saving valuable time.
- They are compact enough to fit in most cars, making them ideal for contractors and DIY enthusiasts who need to bring their workspace with them.
- Many of these workbenches have integrated handles for transport, pushing the mobile aspect even further.
- Despite their size, these workbenches often come equipped with features like clamp rails or tool slots, allowing you to have essential tools close at hand.
- Some models provide adjustable surfaces, ensuring versatility for different project requirements.
- They might also offer storage spaces underneath the work surface, thus optimizing the space.
Committing to this kind of workbench means trading a bit of surface area for flexibility and convenience, a beneficial trade-off for many, as it essentially allows you to bring your workshop wherever you go.
Adjustable Height Workbench
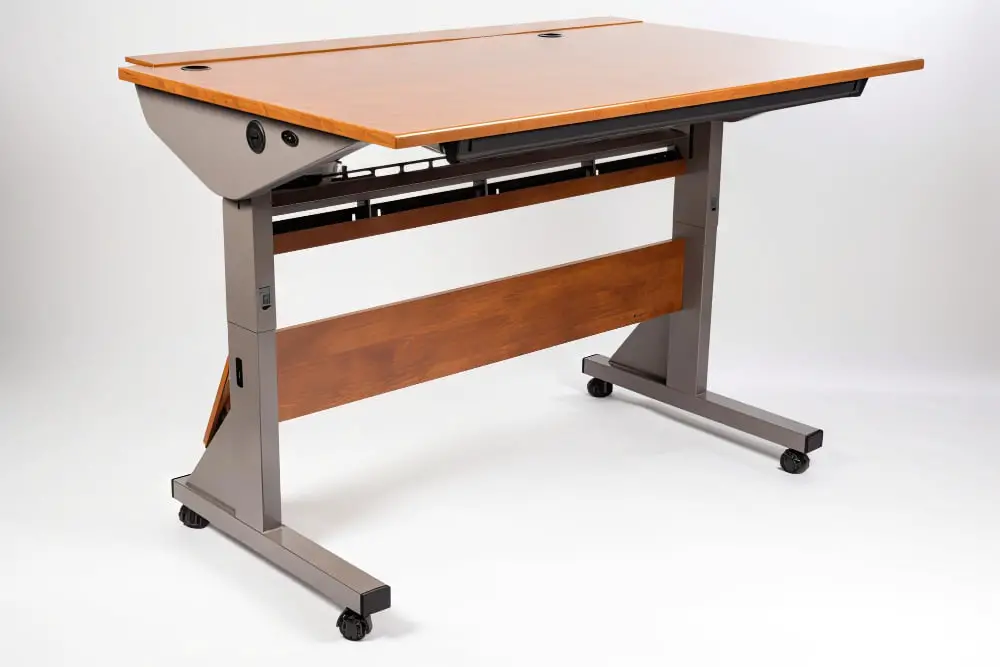
The ability to adjust the height can offer a range of benefits. It can significantly boost your comfort by allowing you to align the bench height with your physiological dimensions and the specific nature of your task. Whether you’re standing or seated, an adjustable height workbench can be tailored to suit your needs.
Key Features:
- Customizable heights: This feature caters to tasks which require varying working heights. It’s beneficial whether you’re short, tall, or using a standing or seated work setup.
- Enhanced posture: With the right height, you can maintain a healthier posture for longer periods, reducing fatigue and strain during lengthy projects.
- Multi-user friendly: Ideal for workplaces with multiple users of different heights, a feature much appreciated by families, schools, and cooperatives.
- Ergonomic advantage: Alleviates stress on the back, neck, and shoulders, promoting overall well-being during long hours of work.
Steps to Make the Most of an Adjustable Height Workbench:
- Identify your comfortable height: For precise positioning, note your most comfortable height when standing or seated. This will help in setting bench heights for different tasks.
- Consider the nature of the task: For tasks that require more detailed work, a higher bench level would be more appropriate.
- Adjust for multiple users: For a shared workspace, take note of the height preferences of the frequent users.
- Prioritize posture: Even if a task seems easier at a particular height, if it promotes bad posture, adjust accordingly.
By incorporating these insights, an adjustable height workbench can easily become a key contributor to a well-functioning, seamless workspace.
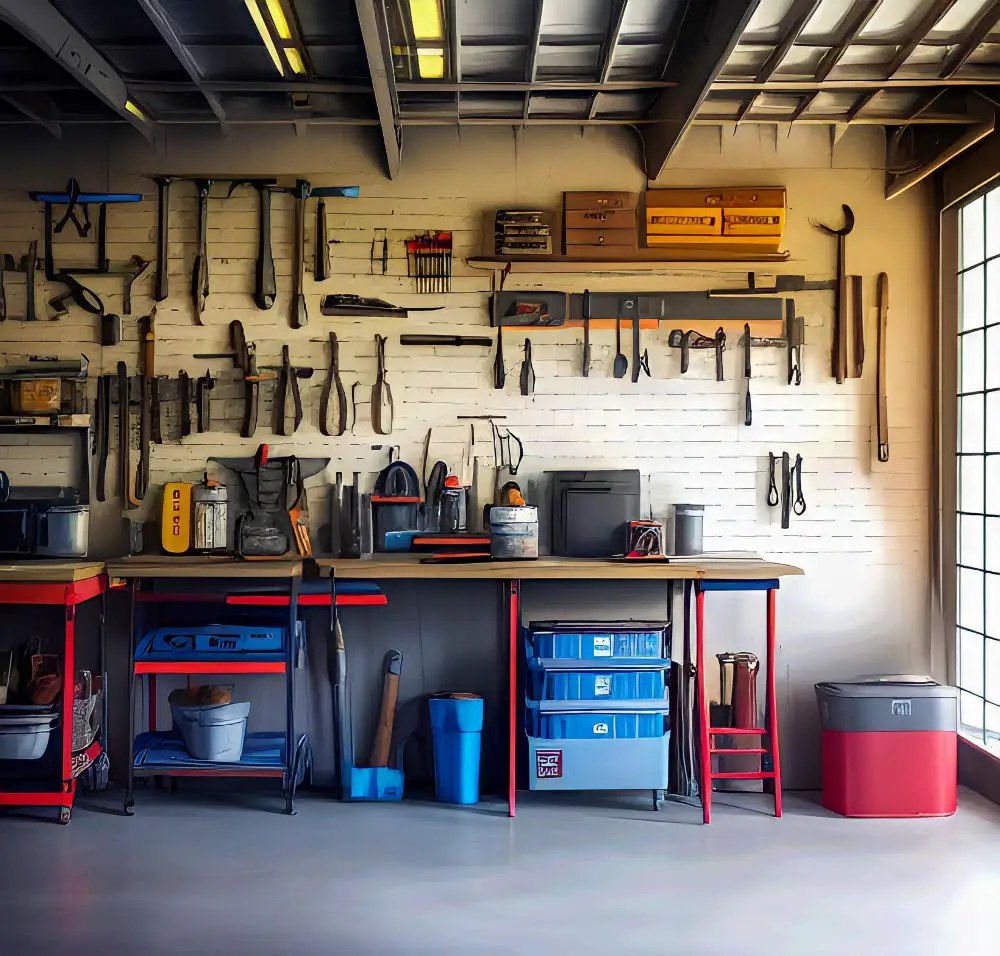
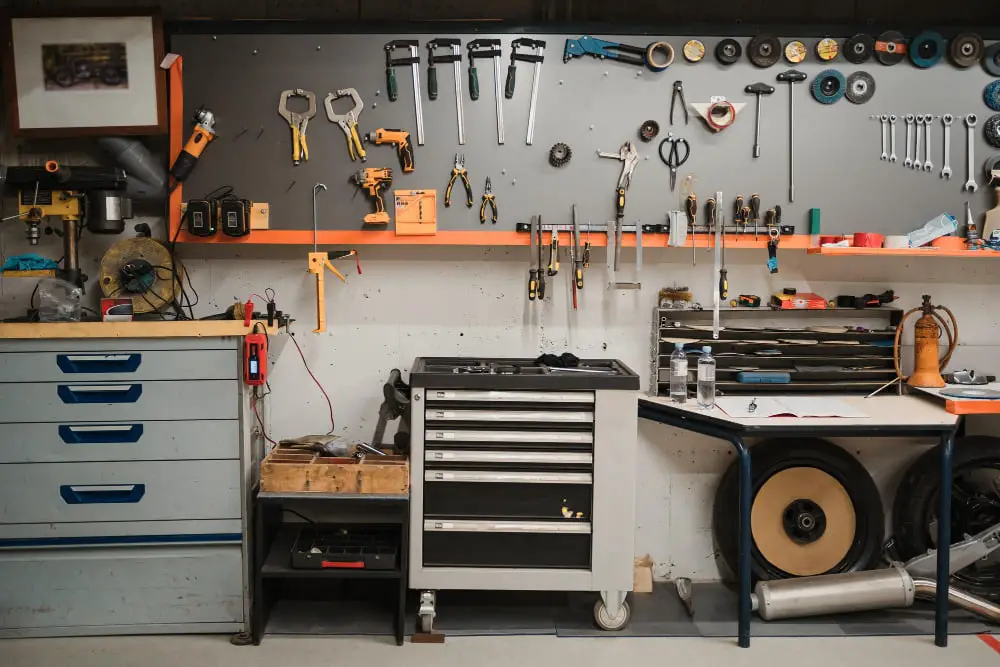
Workbench With Pegboard Backing
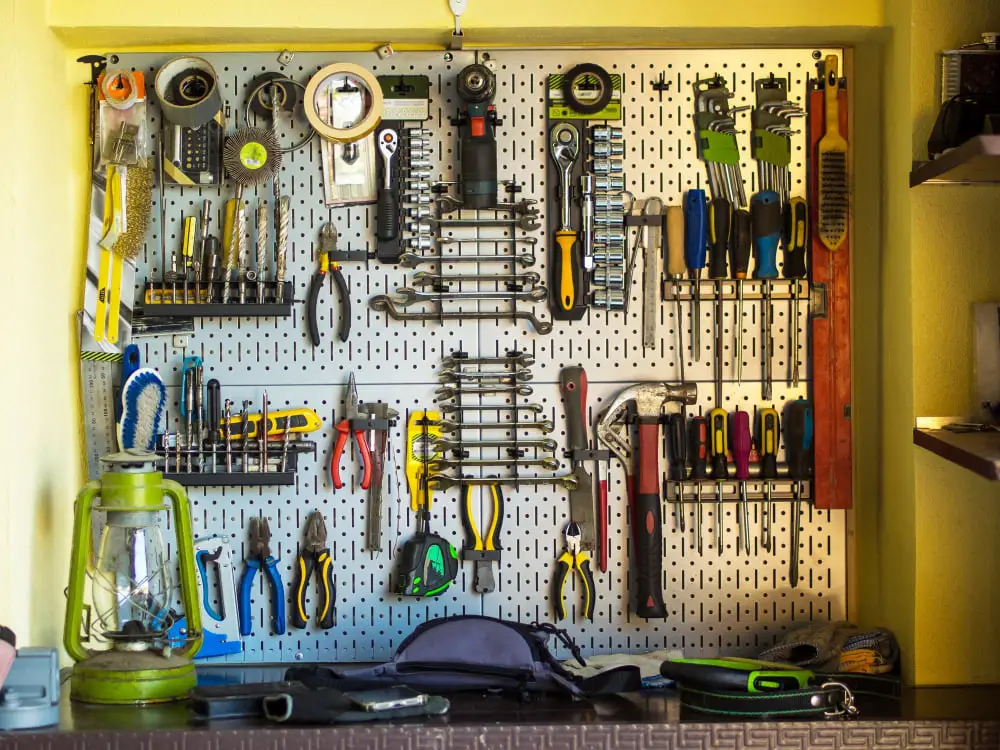
A workbench with pegboard backing serves as a versatile addition to any garage, allowing easy access and organization of tools. Its key benefit is the ability to customize your tool storage, reflecting your personal work style and project needs.
One could begin setting up the workstation by attaching a sturdy pegboard to the back of the workbench, secured with appropriate hardware. Depending upon the size, several may be needed. Plan for enough space to hang all your tools and supplies.
The next step involves deciding which tools to hang on the pegboard. Generally, one may start with frequently used tools like hammers, hand saws, levels, and screwdrivers. Having these tools in plain sight allows for quick access and improves work efficiency.
You can then separate your tools by type or by function. For instance, you could designate areas for woodworking tools, metalworking tools, and general hand tools. Simple hooks and bins designed for pegboard use make it easy to hang and rearrange things.
Small buckets or bins can be hung on the pegboard to hold screws, nails, and other small items that can be hard to manage. Label the containers for quick, at-a-glance access.
With a little foresight and a touch of creativity, a workbench with pegboard backing can turn an average garage into a more functional, organized, and efficient workspace. It also helps create a safer, less cluttered workspace by keeping your tools off the work surface but still within easy reach.
Kids Workbench for DIY Projects
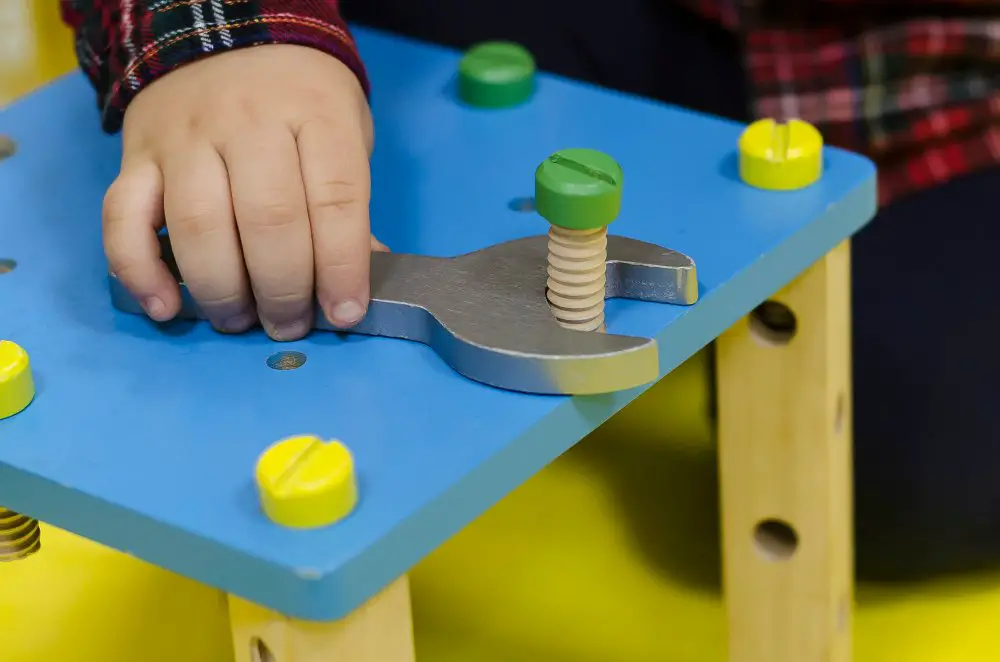
Building a kids workbench for DIY projects provides a safe and functional place for budding craftsmen to hone their skills. Using durable yet lightweight materials makes it easy for the workbench to withstand energetic use, while ensuring it doesn’t pose a significant safety hazard.
Safety measures, such as sanding down all corners and edges, and not including any sharp tools, are crucial aspects to consider. Besides, making this workbench kid-friendly involves bright and stimulating colors which will encourage children to spend time creating and learning.
Designing the workbench to be height appropriate is essential to ensure your child’s comfort during use. For ease of materials and tools access, open shelving or small storage drawers can be incorporated.
Here are the steps to consider:
- Choose a location in the garage that is safe, and preferable close to a natural light source,
- Select the right size and type of wood, preferably lightweight, for the structure,
- Cut wood pieces according to the desired dimensions,
- Assemble the structure by screwing or nailing each piece together,
- Sand down all the edges and corners to ensure they are not sharp,
- Paint the workbench in bright, stimulating colors,
- Add shelves or drawers as required for tool and material storage,
- For an extra fun touch, consider incorporating a small chalkboard for kids to jot down their project ideas or drawings.
Remember, the goal is to spark creativity and learning while ensuring safety, so keep those factors at the forefront of your design and build strategy.
L-shaped Workbench for Larger Garages
An L-shaped setup essentially capitalizes on the available corners of a garage while offering ample surface area for various activities. The design is highly efficient, containing two sets of workbenches set perpendicular to each other, ensuring every inch of space is well-utilized.
There are some key details you may want to consider:
- Ensure there is a comfortable height for the workbench – it should typically match the height of your waist or slightly below. This helps in avoiding back strain during those long hours of work.
- Include ample storage options underneath the benches with drawers or shelves. This helps keep tools, substances, and materials well-organized and easy to reach.
- Depending on the nature of your tasks, consider adding a sturdy vice at the corner where both benches meet. This could serve as an excellent location for jobs requiring clamping.
- Incorporate access points for power, either in the form of strip plugs or integrated outlets. Remember to place them at a reachable distance, but away from any source of water or dampness.
- If woodworking is to be undertaken, plan for a dust extraction system to keep the area clean and safe.
- Consider different workbench materials for each section – perhaps a softwood top for one (ideal for crafting or soldering), and a tough, resilient surface such as a sheet of stainless steel for the other side (perfect for heavy-duty mechanical work).
Getting the right structure enhances productivity and makes time spent on DIY projects enjoyable. Whether you’re constructing this L-shaped workbench yourself or getting it custom built, the above considerations will help achieve a practical and efficient result.
Workbench With Built-in LED Lighting

Built-in LED lighting on a workbench is a game-changer for tasks requiring precision and accuracy. The clear advantage is the immediate illumination of the worksurface, eliminating shadows cast by other light sources, and generally improving visibility for intricate work.
This type of workbench primarily consists of:
- An integrated light fixture, usually LED due to its long lifespan, minimal heat emission and high luminosity.
- A dedicated on/off switch. This allows direct control of the light source without needing to move away from the workspace.
- A protective casing for the light fixture. Crucial for durability, this safeguard ensures that the light source remains unaffected by dust, debris, and impacts that are common in a workshop environment.
The installation process is straightforward. It involves securing the light fixture, wiring it to a power source, and installing the switch. Often, pre-assembled units can be purchased and easily installed.
For the best results, it’s recommended to position the LED light directly over the main workspace, often at the back or sometimes even along the full length of the workbench depending on the nature of the work.
Remember, safety should always be the top priority. Always use protective covers for all electrical units and make sure any wiring is properly insulated and secured. If you’re not confident regarding the electrical setup, it’s best to engage a qualified electrician.
Workbench With Upper and Lower Shelves
A workbench with upper and lower shelves provides a perfect balance between workspace and storage. The primary bench surface allows you to complete your DIY tasks with ease while the additional shelves help keep tools and materials organized, leading to a clutter-free working area.
The upper shelf serves as a perfect storage for lesser-used tools, materials or manuals which you need occasionally. It keeps them within reach without consuming valuable surface space on the workbench itself.
The lower shelves can be designed to hold larger tools and equipment, or used to store rarely touched items, akin to a basement storage.
Integrate pull out drawers into the design. These can offer sorted storage for smaller items such as nails, screws, drill bits, and other small hardware parts.
Consider allowing sufficient space between the workbench surface and the upper shelves, to avoid knocking things off when working on larger projects.
The shelves can be made adjustable to accommodate different sizes of tools or materials. A modular system with removable bins or boxes can also add flexibility and convenience.
The surface material of the shelves can be chosen to suit your needs; for example, durable hardwood for heavy items or vinyl-coated particleboard for easy cleaning.
Implementing a labeling system on the shelves can greatly speed up the process of finding stored items.
Remember, the goal is to create a workbench layout that improves productivity by allowing you to quickly find and access your tools and materials.
Stainless Steel Workbench for Easy Cleaning

An ideal choice for the meticulous artisan, the stainless steel workbench offers an array of advantages that make it a worthy consideration.
Firstly, the standout characteristic of these workbenches is their unparalleled ease of cleaning. Spillages, stains and debris are all effortlessly wiped away, giving you a clear, clutter-free space to continue your work in minutes.
Then there’s their durability. Resistant to both corrosion and heat, these worktops can handle the grueling conditions of varied workshop tasks, all while maintaining their sleek, metallic elegance over time.
The material’s inherent resilience against damage also makes stainless steel workbenches suitable for heavy-duty tasks, such as drilling or cutting. This implies fewer concerns about denting or scratching your workspace, allowing you to focus solely on your project.
To boost efficiency, one might consider customizing their stainless steel workbench with customizable drawers and compartments. These additions provide easily accessible storage solutions, creating a streamlined working environment and keeping your tools within arm’s reach.
Finally, consider installing an overhang or undershelf for additional space. Such configurations can accommodate containers or bins underneath, useful for segregating different types of waste, or stowing away items not frequently used.
Remember, your garage is an extension of your home, and the workbench, your personal workspace. Making it visually pleasing, functional, and easy to maintain, like the stainless steel workbench, will not only enhance your productivity but also add to the overall aesthetic of your garage.
Bench-top Bandsaw and Drill Press Station

A bench-top bandsaw and drill press station elevates a garage workbench to a whole new level. This space-efficient design combines two crucial woodworking tools in one spot, optimizing your working area.
The key benefits of this approach include:
- Easy Access to Tools: The convenience of having both a bandsaw and a drill press at arm’s length cannot be overstated. Transitioning between tasks becomes smooth and efficient.
- Space-saving: By stacking these tools vertically, you save valuable horizontal space on your workbench.
- Interchangeable Use: Swapping between the bandsaw and drill press is straightforward, presenting a practical solution for multi-tool projects.
Creating your own bench-top bandsaw and drill press station is possible by carefully allocating space on your workbench. Keep the following essential steps in mind:
- Measure Your Tools: Ensure your bandsaw and drill press can comfortably fit on your workbench without encroaching on necessary workspace.
- Secure Mounting: Fasten each tool securely to the workbench. This guarantees safety while also reducing vibration during operation.
- Keep It Organized: Plan for tool storage. Incorporating vertical shelves or under-bench cabinets can prove beneficial for housing smaller tools and accessories.
- Prioritize Comfort: Last but certainly not least, place the tools at a height comfortable for frequent use. This promotes better posture and helps prevent back strain over long work periods.
So, by optimizing space, you can enhance the functionality of your garage workbench with a bench-top bandsaw and drill press station.
Roll-away Workbench for Flexible Workspace
A roll-away workbench offers unmatched versatility, effortlessly catering to a variety of projects. Its mobility affords the convenience of rearranging the workspace as and when required.
Major advantages of such a design include:
- The freedom to relocate the bench according to the workspace needs
- An ideal choice when managing limited garage space, it can conveniently be rolled out of the way after completion of tasks
- The wheels can be locked to prevent unanticipated movement during use
Considerations while planning a roll-away workbench:
- Sturdy wheel installation to handle the weight of the bench and tools aboard
- Brake features on the wheels for safety and stability
- Ideal bench height with respect to user comfort
- Provision for tool storage and accessibility, so the tools can be moved along with the bench
The beauty of a roll-away workbench lies in its adaptability to create a customised workspace. The transformative ability to relocate your work area facilitates a more efficient workflow and caters to your unique requirements. It’s important to select high-quality caster wheels and plan for appropriate tool storage to maximize the bench’s functionality.
Pallet Wood Workbench for Eco-friendly Solution

When embarking on creating a pallet wood workbench, select pallets made of hardwood for durability. Salvaging hardwood pallets can be an economical choice, as well as a sustainable one, reducing landfill waste.
First, dismantle the pallets, prying the slats apart. Sand the boards thoroughly for a smooth work surface and to prevent possible snagging or splintering.
Secondly, plan the size of your workbench, and cut your pallet wood accordingly. This design allows for customization based on your available garage space and desired work area.
Next, assemble the workbench frame. Use the thicker pallet sections for the legs and frame for stability. Secure the slats across the top for your primary work area. For added versatility, install a lower shelf using more pallet slats for tool storage.
While crafting your workbench, remember to pre-drill all screw holes to prevent splitting the wood. It’s best to utilize wood screws for secure, robust construction.
Finally, seal your workbench with a quality wood sealant to protect against potential damage from garage spills or dampness. Sealing can also highlight the natural beauty of the reclaimed wood for a rustic, yet professional look.
Overall, creating a pallet wood workbench demonstrates an eco-friendly approach to workshop organization. Your garage becomes both a testament to sustainable practices and a functional space tailored to your needs. And while you’re at it, don’t forget to recycle the leftover pallet pieces!
Workbench With Integrated Power Outlets
Having power outlets built directly into your workbench eliminates the need for extension cords strewn across the floor – a potential tripping hazard and a hindrance to maintaining a tidy workspace. Power tools can be plugged straight into the bench, not only providing convenience but also promoting safety.
Consider the number of outlets you need: Would two suffice or perhaps four would be better? That will depend on the variety of tools you plan to use simultaneously.
It’s also important to think about the placement of these outlets. You might prefer them on the side of the workbench for easy access, or at the back to keep cords out of your way while working.
For an additional touch of practicality, look into integrating USB ports amongst your outlets. These can provide handy charging stations for your phone or other devices – so you can follow instructional videos or keep track of project plans during the work process.
Remember to use split conduit or cable tubing for cord management. This will protect cords from accidental cuts or abrasions, contributing to a safer and more efficient work environment.
Lastly, to ensure safety and adherence to local laws, consult with a professional electrician regarding power outlet installation or, if you are a proficient DIYer, verify the correct installation process.
Workbench With Vise for Woodworking
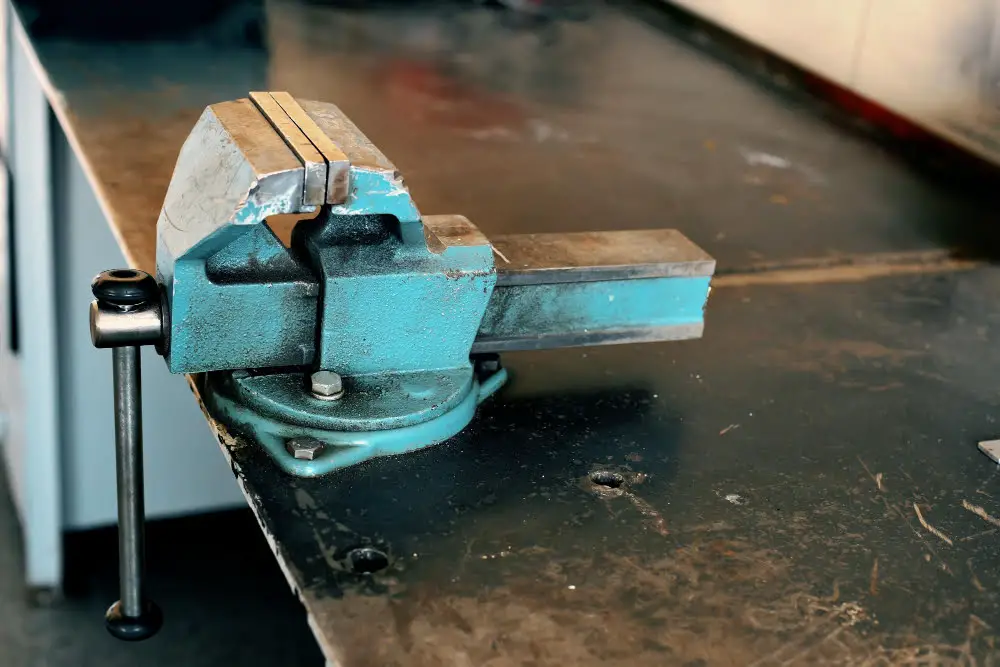
A workbench equipped with a vise offers improved functionality and versatility for any woodworking project. The vise acts as an extra set of hands, firmly holding your materials in place during cutting, shaping, or joining processes. Thus, helping to increase precision and safety.
The installation of a vise on a workbench is typically a straightforward process. First, identify a suitable location on your workbench, preferably on a corner, which will enable you to handle lengthy materials with ease. Then, secure the vise using the appropriate screws or bolts.
There are numerous types of vises available in the market for different woodworking needs. A few examples include:
- The bench vise, fixed to the edge of the workbench. It provides a firm grip and is perfect for heavy-duty tasks.
- The face vise, attached to the front of the workbench. It is great for holding boards upright or laying flat.
- Lastly, the tail vise sits at the end of the workbench and extends the work area, an excellent solution for wider planks or sheets.
Additionally, some vises come with an integrated anvil, useful for metalworking tasks. So, when selecting a vise, consider the size and type that best fits your working style and the tasks you perform regularly.
Convertible Workbench to Table Design

Having a convertible workbench that doubles as a table serves multiple purposes in a garage space. The ingenious design lends itself to a variety of tasks while maximizing the utility of square footage.
Primarily, a convertible workbench offers versatility. It transitions easily between a sturdy workspace for heavy-duty projects to a smooth, flat table for tasks requiring more refinement such as drafting or a surface for assembly. This is useful for hobbyists who dabble in a variety of disciplines, from carpentry to model building.
Most designs incorporate a simple, user-friendly mechanism to make the conversion process quick and easy. This can be a hinge or slide system, along with locking functionality for safety. This ensures the workbench remains secure and stable during use.
An important consideration when opting for a convertible bench to table design is the material choice. Hard-wearing materials like heavy-duty laminate or treated wood provide durability. This ensures the workbench withstands the rigors of workshop tasks, while still offering a smooth surface suitable for table use.
To maximize the functionality further, consider a design that includes integrated storage. This could be in the form of drawers, shelves, or compartments. This helps keep tools and materials within easy reach when the unit is in workbench mode, but also neatly tidied away when transformed into a table.
Lastly, enhancements such as integrated rulers or measurement grids can be included in the tabletop design. This not only adds functionality but means the necessities for different types of work are always close to hand.
All-in-one Workbench With Dust Collection System
An all-in-one workbench with a dust collection system is a quintessential install for those heavily into woodworking. It offers a convenient and tidy workspace, reducing the potential physical toll often associated with prolonged exposure to wood dust.
Key features include:
- Integrated Dust Collection System: This key feature operates by suctioning dust particles produced during work, depositing them into a connected bag or bin. This built-in functionality ensures a clean workspace and significantly reduces post-project cleanup.
- Strategic Design: All-in-one workbenches are purpose-built for efficiency. They often incorporate a Table Saw, Miter Saw, or Router Table directly into the workbench. This layout enables quick access to tools and facilitates a streamlined flow of work from one tool to the next.
- Storage Spaces: These workbenches typically come equipped with a range of storage spaces, such as drawers, shelves, or cabinets, suitable for storing tools and materials. This not only keeps the workspace uncluttered but also ensures the necessary tools are within easy reach.
- Customizable: Many all-in-one workbenches allow for modifications to suit one’s needs. Potential enhancements could be additional lighting, power outlets, or tool holders, making the workspace more fitting and comfortable.
To implement this in your garage:
- Plan Space: Assess the available garage space and consider how the all-in-one workbench will fit in. It should allow for easy movement around it.
- Select the Appropriate Type: On considering the nature of your projects and which tools you use most often, select a design that appropriately integrates these tools.
- Set Up Correctly: Follow the manufacturer’s instructions while setting up to ensure the dust collection system works effectively.
- Maintenance: Regularly check, clean, and maintain tools as well as the dust collection bag or bin. This promotes a healthier working environment and prolongs the lifespan of the workbench.
Considerations:
- Size: Ensure the workbench selected fits comfortably in your garage space without impeding movement.
- Power Source: The workbench and its dust collection system will require power. Consider where the nearest outlets are in relation to where you plan to situate the workbench.
- Noise: Consider the sound produced by the dust collection system. If it is excessive, think about investing in soundproofing your garage or using ear protection.
- Cost: High-functional all-in-one workbenches can be an expensive outlay. Consider your budget and how much use you will get out of the workbench before making the purchase.
Related
 15 Ideas Vintage Ford Bronco Enthusiasts Will Love
 15 Vintage Mustang Restoration Ideas to Inspire Your Next Project
 Classic Ford Bronco Buying Guide: Tips for Choosing Your Vintage Ride
 15 Ideas for Enjoying the Pittsburgh Vintage Grand Prix
 Classic Cars for Sale Minnesota: Your Buying Guide to Vintage Vehicles