Last updated on
Here’s how you can create a unique and beautiful display of plates for wall art. Follow these steps to learn how to create the arrangement and add the anchors to hang them.
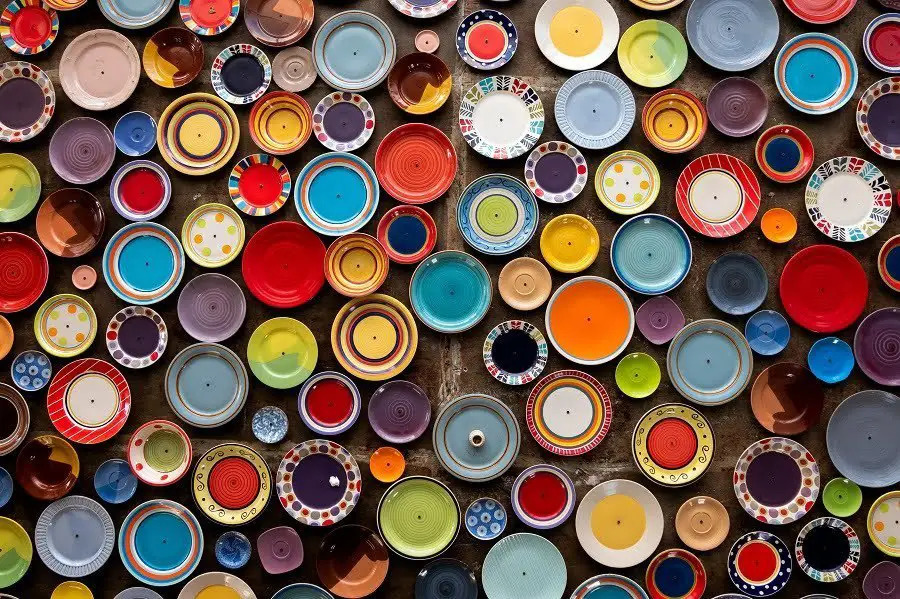
You’ve seen those gorgeous photos on Instagram and pins on Pinterest that show off beautiful plate arrangements for wall decor. It’s whimsical and artistic. Why not make something like that at home yourself? There are just a few technical details to take care of.
We’ll go over the supplies you will need for this project. Then we will look at the steps you need to take to create a beautiful display. This will include making a template and creating the design before moving it to the wall. We will also discuss the option you have for mounting the plates on the wall.
Supplies You’re Going to Need
- Painter’s tape
- A pencil
- Crafts paper
- Hangers for the plates (or disc hangers)
- Nails
- Picture frame hangers
- A hammer
Measure
Find the bare wall (or wall section) where your plates are to be hung and calculate the dimensions of the area you want to protect. This will be your wall art canvas.
Arrange the Layout of Your Display
Determine how many plates you want to hang and how best they look. Try many combinations before the plates you prefer have been arranged, taking the wall’s surroundings into account. When for instance, you hang your plates on the table or a shelf, at least allow some visual space between the plates and other items so that the arrangement doesn’t feel tight. It is essential to test different options to understand better how the plates look at your wall. Don’t fear shy of symmetrical structures and work with a mix of different shapes and sizes to make your composition more exciting. When you have mounted a pattern, please take a photo to reproduce it quickly on your wall.
Make the Swatches for Plates
To draw outlines on a large piece of kraft paper, use a pencil. The design must not be precise but should match each plate’s width to ensure that you calculate the space correctly. Cut every template out.
Tape Them to the Wall
Take the design from the table or floor to the wall with a blue painter’s tape. I find it simpler to start by measuring the central piece location and then to work out for others to map the distance between each plate and its size so that a mockery is made of the wall.
Add Hangers
The main difference is that art, since it was designed to hang on a wall, typically comes with a wire or hanger. Plates, of course, don’t. Your new best friend comes here: hanging wires on the plate. Get the kind of springs so that they hold your plaque securely and they do not break it or chip it with coated edges. The wires are available in different sizes for all plates and are often fitted with hooks and nails. Put the wires on the plates.
The alternative to this is these lovely adhesive plate hanger disks. They are cheaper, but the price is undoubtedly worth it. The plates are free of damage – including antique China! The disks are also removable without any damage to your plates.
Make sure the back of the plate is very clean – dust free and lint-free. Otherwise, the disk would not adhere as it should.
Mix a little water into the adhesive on the disk with your fingertips. Let it activate until the glue is sticky for 3-7 minutes.
Apply the disk to the plate back. Add it to the middle to ensure the hanging ring is in the right place to build your plate. Click firmly, eliminate any bubbles of air. Enable 24 hours to dry.
Check the adhesion of your disk before hanging the plate to ensure your glue lasts well.
Place the Plates on the Hangers
Once the templates are secured, connect the plate hangers to your dishes. Nag the hooks in the wall to hang your dishes. Keep the plates up to their respective templates and mark where the platform’s hangers (back of the plates) fall. Match with these markings the hooks of the image hangers. You will find that you need to make minor layout changes while you work. Make every 3–4 plates a step back to ensure that you like the arrangement.
Change if Necessary
Also, the best DIYers make mistakes and, despite your measurements, everything might look a little off after all is said and hanged. If so, don’t be afraid to shift the plates or move the hooks somewhat—your plates will possibly cover extra trout!